These laser machines are equipped with the highest safety standards of laser class 1. Standard delivery includes a 2-year warranty and software updates. Also included as standard are dust-free guide rails, LightBurn software, ultrasonic autofocus, red pointer, Siemens safety components, software-controlled air valve, and exhaust delay.
These laser machines are equipped with the highest safety standards of laser class 1. Standard delivery includes a 2-year warranty and software updates. Also included as standard are LightBurn software, red pointer, and safety components from Siemens.
This machine with an - literally - open bed can process large sheet materials. This allows you to effortlessly cut large objects or easily obtain large quantities from a single sheet.
How do I make my Slim machine and rotation unit ready for use?
When you want to use the rotation unit, there are certain steps to follow.
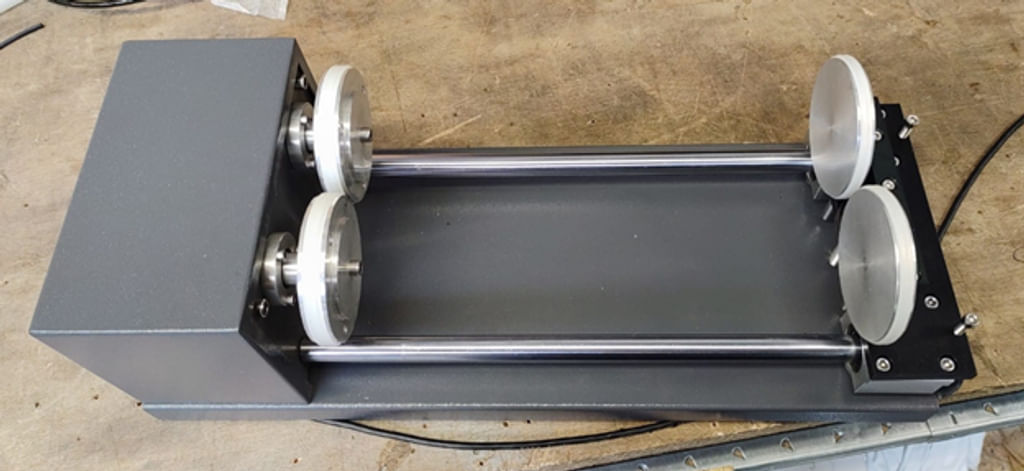
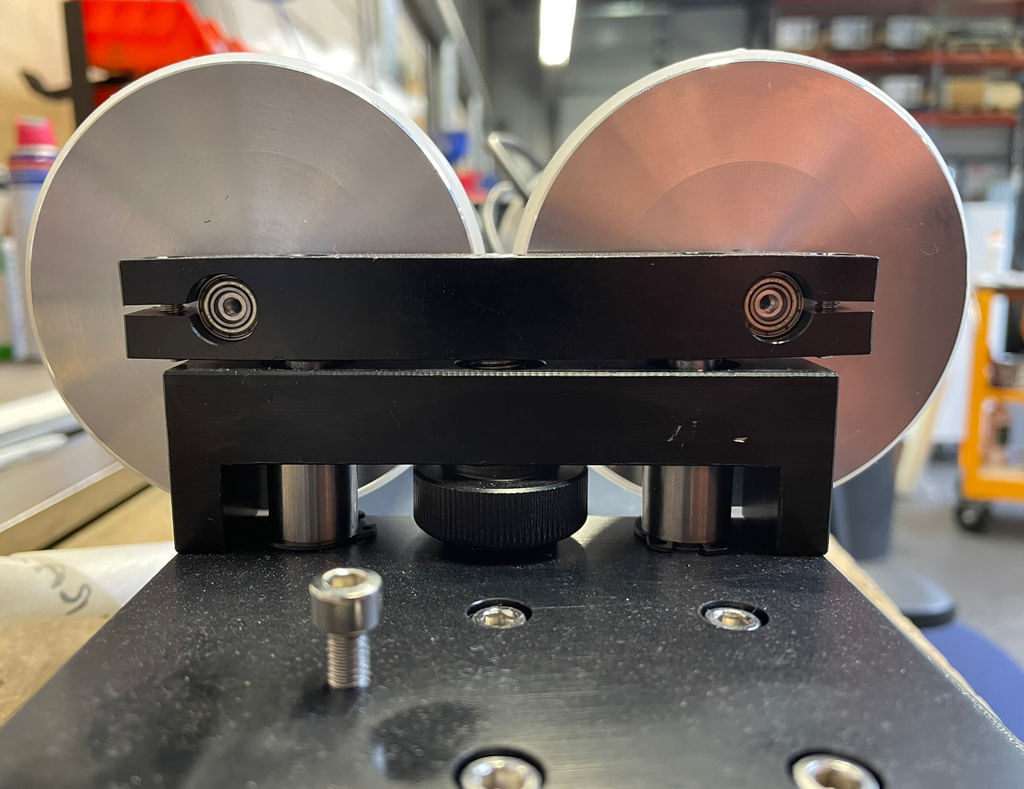
The rotation for the Slim is a roller rotation by default. That means there are 4 rollers, 2 of which are powered by a motor. The other rollers can slide forward and backwards depending on the length of your product. You adjust this to make sure your product has enough support. The rollers can spread about 30 cm apart. If your product is longer, it will stick out. Be careful that your product does not stick out too far, because it may start to move and change position during rotating.
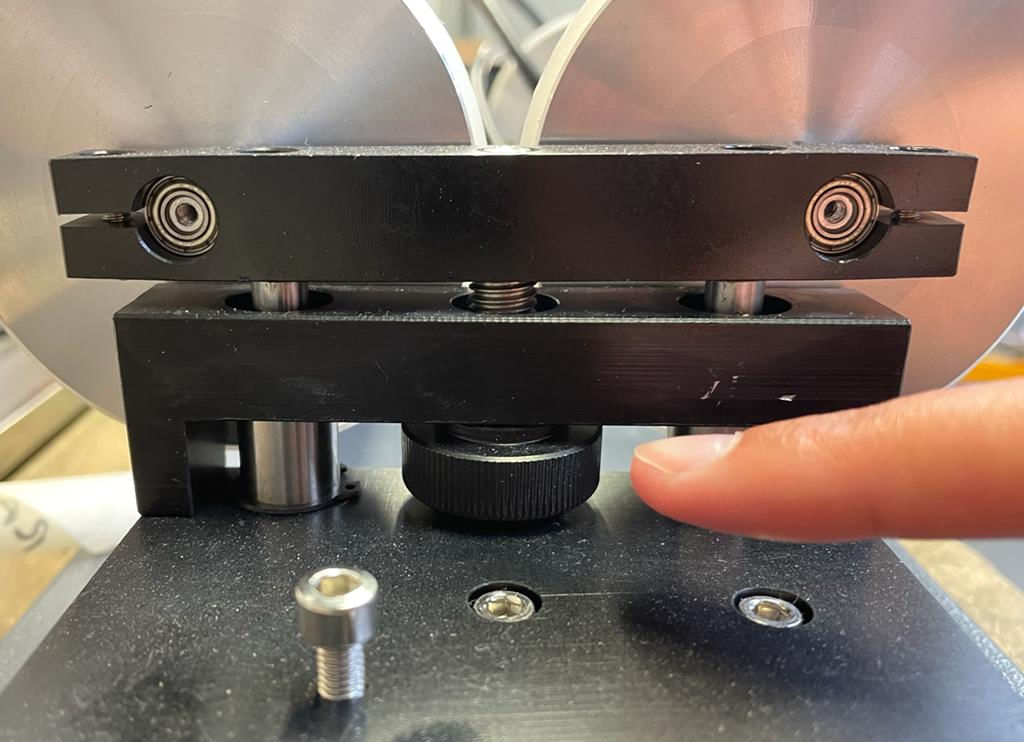
The roller rotation comes with a chuck plate as well. You can attach this to one of the rollers with 3 threaded ends and bolts. The chuck must be attached to one of the rollers powered by the motor.
With the chuck plate, you can clamp a product.
Roller rotation
When you want to use roller rotation, it is important to measure one of the rollers first. You will need its diameter later. Measure the outer diameter of the roller, from rubber to rubber. That comes pretty precise, so use a caliper. Please write down the diameter.
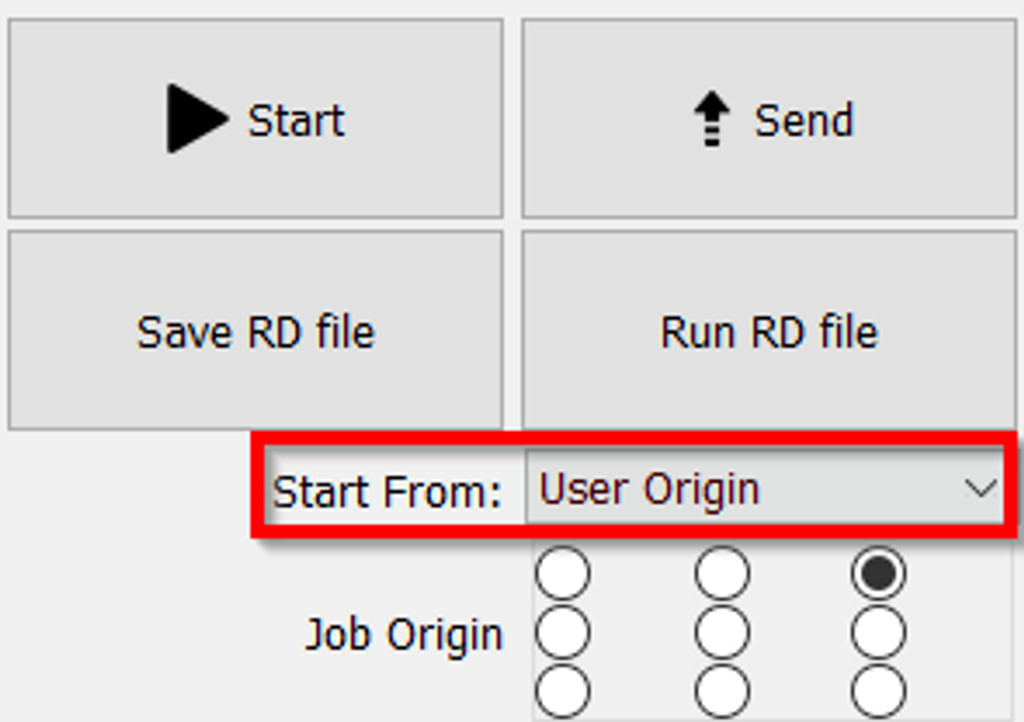
Move the laser head with the buttons to the top right of the machine. Press Origin on the display. Be sure to start from the "User origin" in the software.
Next, remove the table from the machine. Position the roller rotation in the machine with the motor to the left. Make sure the cable is not underneath the rotation.
Connect the cable with the plug to the machine. On the right side of the machine is a wall plug where the plug of the rotation can be connected.
Now reset the axes. Because you have placed the axes in the upper right corner and have "User origin" selected in the software, there will be no collision between the laser head and roller rotation / product. Once the machine has finished the reset, you can place your product on the roller rotation.
Move the laser head towards your product. You will notice that you cannot move in the Y direction using the buttons on the display. You can, however, move the X-axis using the buttons. When the laser head is positioned correctly in the X direction, you can manually move the laser head in the Y direction correctly. Position the laser head above the center (highest point) of your product. Adjust the focus height. Be careful when using the autofocus sensor, we recommend not using the autofocus sensor when using the rotation unit. It is best to manually set the right focus height.
If there is too much distance between your object and the laser head, you can move the laser head back slightly. Raise the Z-axis slightly with the Z+ button. Then put the laser head back above the highest point of your object.
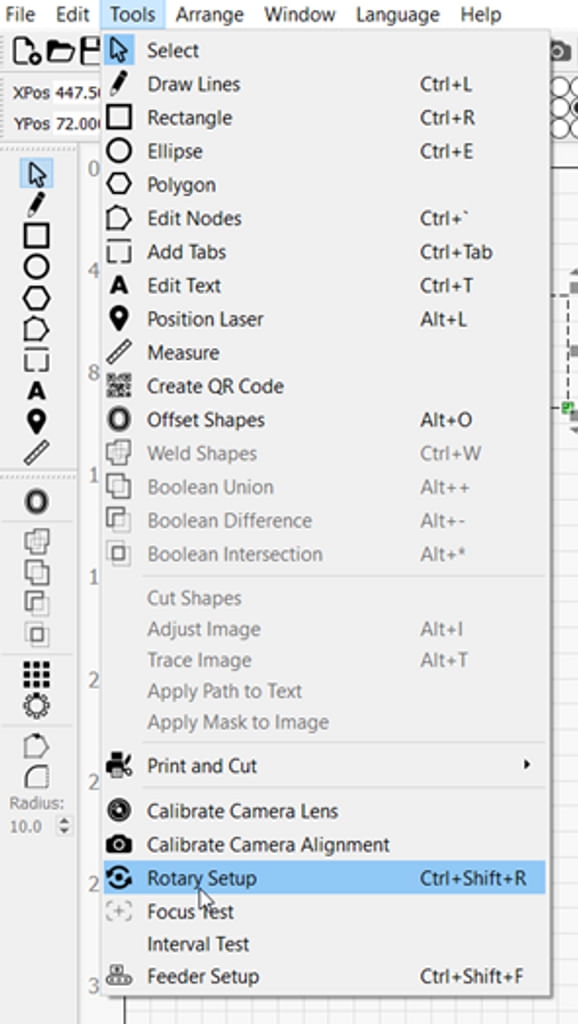
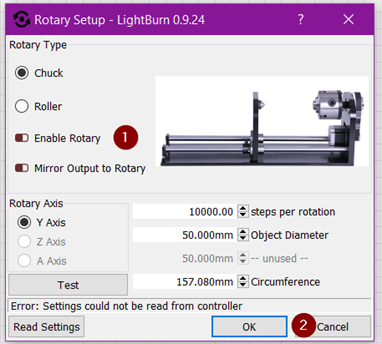
After that, in the LightBurn software, go to Tools => Rotary setup.
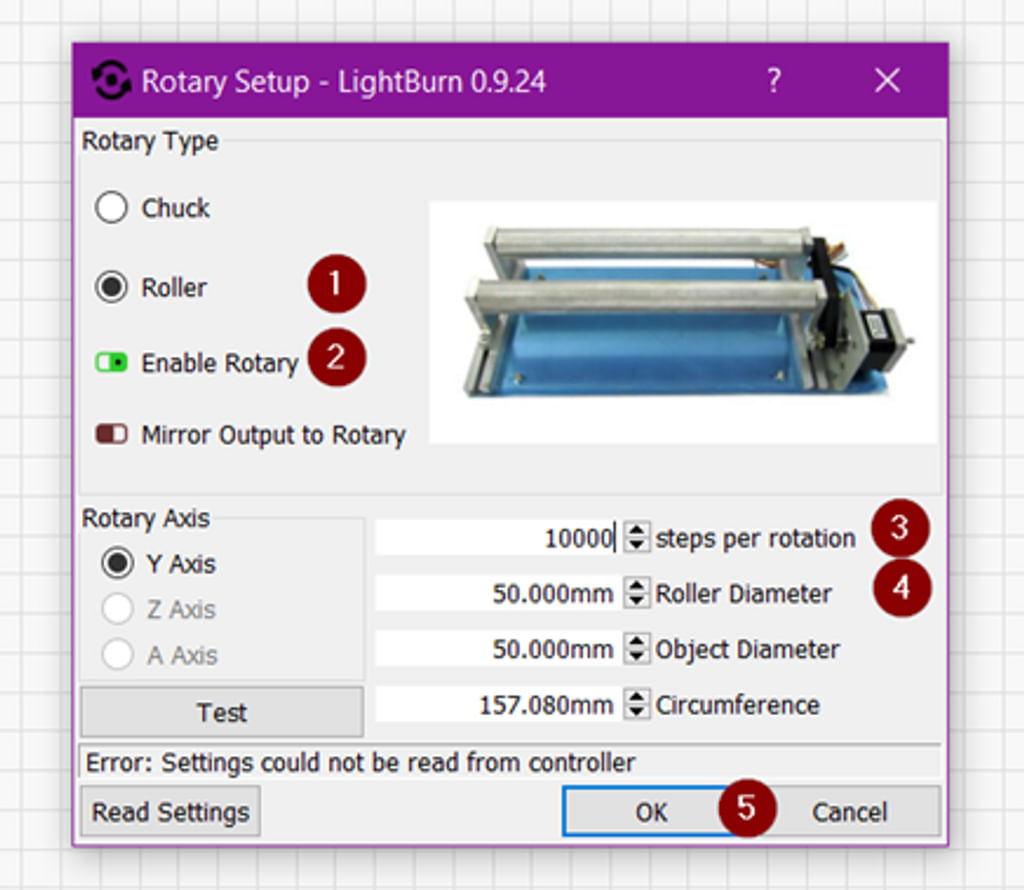
Please make sure the circle for Roller (1) is black. Also, check that Enable Rotary (2) is on. You can see that it is on because the slider will be green.
Enter 10000 for Steps per rotation (3). That, together with the diameter of the roller, will ensure that your program has the correct dimensions.
At Roller diameter (4), enter the diameter of the roller you wrote down at the beginning.
You can enter the diameter of your object. The software then calculates for you the circumference of your object but the software does not need these values to function. You can leave out the Object Diameter and Circumference.
Click OK after you have entered the required data.
Draw a square of, say, 2 by 2 cm. You are going to cut this one lightly to check that the dimensions are indeed 2 by 2 cm. Set the speed and power and send the file to the laser machine. Be careful! You want the lines to be visible but not cut through the material. Set the mode to cut [Line] but use parameters you would use for engraving!
When the lines are visible on your product, it is important to measure the line running across the curve. Do this with a tape measure to get the measurement right.
If the line is not 2 cm but larger or smaller, you will need to adjust the 'Steps per rotation'. You entered 10000, it may be that it should be 9998 or 10002, for example, to get the exact size. You will have to try some to get the exact number.
When the size is correct you can start working with the roller rotation. Make sure to write down the steps per rotation so you don’t have to do this every time you want to use the rotation.
Chuck rotation
When you want to work with the chuck rotation you have to attach the chuck to one of the rollers powered by a motor. There are 2 rollers with 3 holes in them. Choose one of the rollers. With the rotation is a small bag containing 3 threaded ends and bolts. Screw the threaded ends a bit into the chuck, on the back of the chuck you find there are 3 holes. Do not screw the threaded ends in too far.
Place the chuck in front of the roller and insert the threaded ends through the holes in the roller. Tighten the chuck with the bolts. Make sure it is tightened securely.
Position the laser head to the right rear of the machine and press Origin on the machine display. In the software, make sure to start from the 'User origin'.
Position the rotation in the machine with the motor to the left on your table. Connect the cable with the plug to the machine. On the right side of the machine is a wall plug where the plug of the rotation can be connected.
Once you have connected the rotation you can reset the machine. Because you put the laser head on the top right and the software is on User Origin, there will be no collision with the rotation.Measure the diameter of your object. Use a caliper to measure the diameter. Write this diameter down, you will need it later.
Clamp your product in the chuck. Make sure your product is clamped securely.
Move the laser head towards your product. You will notice that you cannot move in the Y direction using the buttons. You can, however, move the X-axis using the buttons. When the laser head is positioned correctly in the X direction, you can manually move the head in the Y direction correctly. Position the laser head above the center (highest point) of your product. Adjust the focus height. Be careful when using the autofocus sensor, we recommend not using the autofocus sensor when using the rotation unit. It is best to manually set the right focus height.
If there is too much distance between your object and the laser head, you can move the laser head back slightly. Raise your table slightly with the Z+ button. Then put the laser head back above the highest point of your object.
After that, open the LightBurn software on your computer. Go to Tools => Rotary setup.
Make sure the circle for Chuck (1) is black. Make sure Enable Rotary (2) is on. You can see that it is on because the slider turns green. At Steps per rotation (3) enter 10000. This, together with the correct diameter of your object, will ensure that your program has the correct dimensions. At Object Diameter (4) enter the diameter of your object, which you wrote down at the beginning.The software will calculate the circumference by itself.
Click OK after you have entered the required data.
Draw a square of, say, 2 by 2 cm. You are going to cut this one lightly to check that the dimensions are indeed 2 by 2 cm. Set the speed and power and send the file to the laser machine. Be careful! You want the lines to be visible. Set the mode to cut [Line] but use parameters you would use for engraving!
When the line is visible on your product, it is important to measure the line running across the curve. Do this with a tape measure to get the measurement right.
If the line is not 2 cm but larger or smaller, you will need to adjust the [Steps per rotation]. You entered 10000, it may be that it should be 9998 or 10002, for example, to get the exact size. You will have to try some to get the exact number.
When the size is correct you can start working with the chuck rotation. As soon as you want to process another object, you will have to measure the diameter of your object again and enter it into the software. If you don't do that, the dimensions will be off.
Make sure to write down the steps per rotation so you don’t have to do this every time you want to use the rotation.
How do I go from rotation back to working on the table?Remove your object from rotation unit. If necessary, move the laser head backwards to have more space to remove the object.
Unplug the rotation from the wall plug. Lift the rotation out of your machine. If you have removed your table from the laser machine you can put it back.
In the LightBurn software, go to Tools => Rotary setup.
Disable Enable Rotary (1). You can see that Enable Rotary is off because the slider turns red.Then click OK (2).
After you have completed these steps you need to reset the machine. The laser head will return to the upper right corner. You can now start cutting/engraving a flat product again.
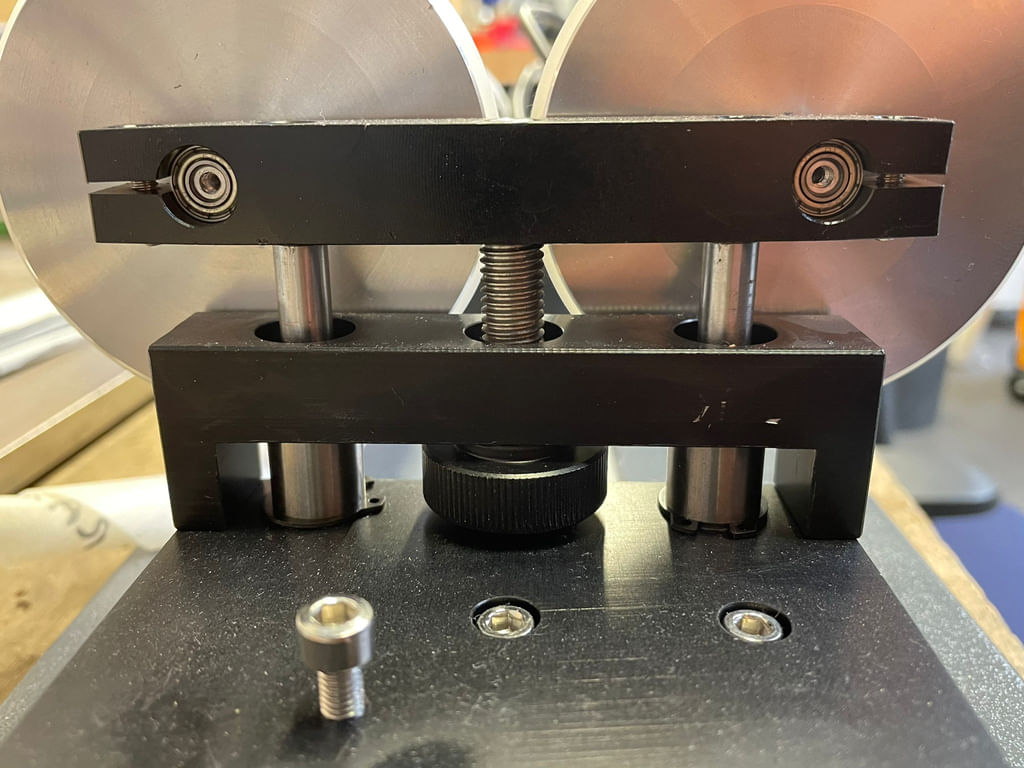
The product is conical, can I adjust the rotation?
If you have a conical product, it will still have to be parallel to the X-axis. If this is not parallel, you will not have the same focus height everywhere and the engraving will not be done properly. To solve this, there is a levelling screw on the rotation that allows you to adjust the height of the rollers. You can only use it when using the rollers. It is not an option if you are using the chuck.After you have the rotation connected in the machine you place your product on the rollers. Then rotate the levelling screw to make sure your product is parallel to the X-axis.